


Written by the AutoMagToday Content Team | Reviewed by Anand Raj, Automotive Review Expert, AutoMagToday | Last updated: October 2026
Quick Answer
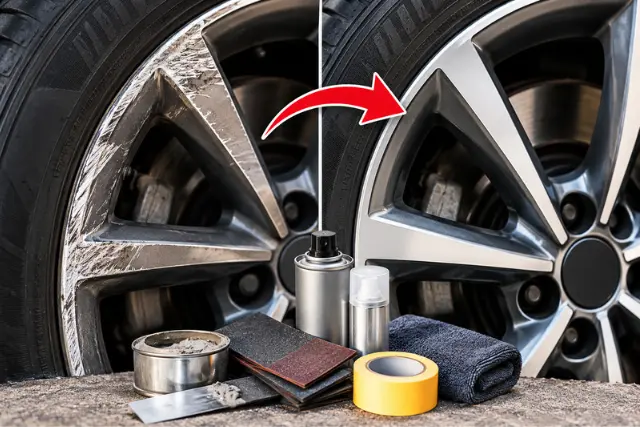
Do you know how to repair scratched car wheels? Cosmetic scratches to alloy wheels can be fixed DIY with some sandpaper, alloy filler, primer, colour-matched wheel paint, and clear coat. If there is any cracking or deep gouging, your alloy wheel will require some professional inspection and possibly replacement – anything structural impacts the ability of the wheel to hold air under speed and load.
You hear it before you feel it grinding scrape as the curb finds your wheel during a tight parallel park. You get out, crouch down, and there it is: a stripe of raw aluminium where paint used to be.
The good news is that most of what people call “ruined wheels” is cosmetic damage that costs under $50 in materials to fix properly. The important news is knowing which damage isn’t cosmetic because that’s where DIY repair stops being thrifty and starts being dangerous.
First: Identify What Kind of Damage You Have
This step decides everything else, and it’s the one most guides rush past.
| Damage type | DIY repair? | Safe to drive? | Replace? |
| Light surface scratches | Yes | Yes | No |
| Paint scuffs / clear coat marks | Yes | Yes | No |
| Standard curb rash | Usually | Yes | Rarely |
| Deep gouges into metal | Maybe — inspect first | Usually | Sometimes |
| Chunks missing from the lip | No | Inspect immediately | Often |
| Bent rim | No | Not recommended | Often |
| Cracked wheel | No | No | Yes |
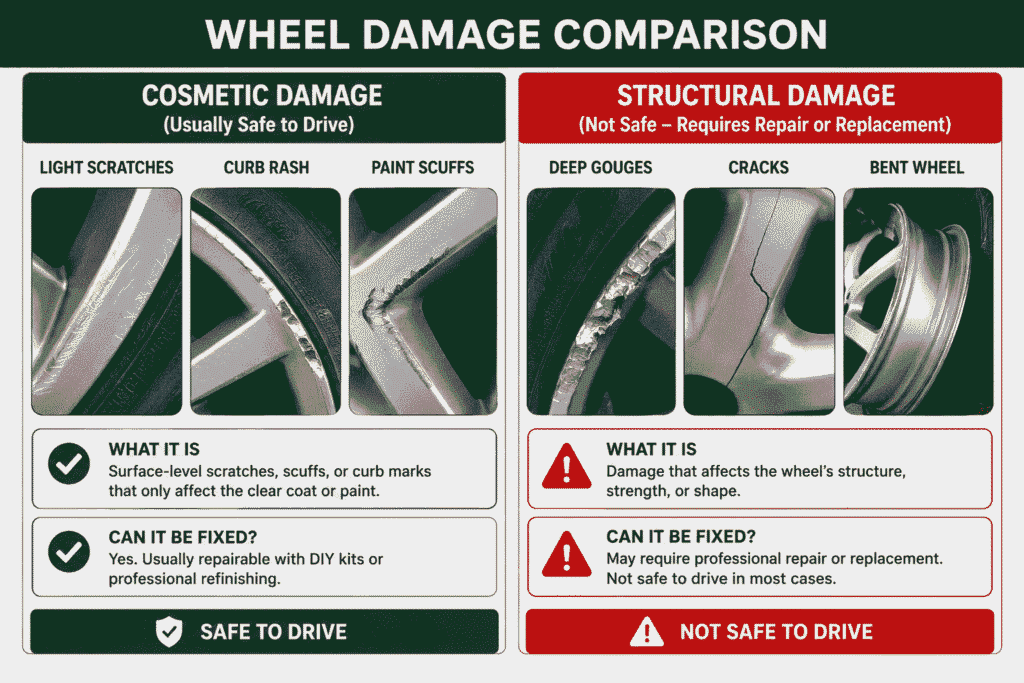
Cosmetic damage affects the finish: paint, clear coat, and the outermost surface metal. The wheel’s strength is untouched.
Structural damage affects the metal itself: cracks, bends, deformation of the bead seat where the tyre seals. These change how the wheel behaves under load, and no amount of paint fixes them.
The practical test: run a fingernail along the damage. If it catches on a shallow groove, you’re likely cosmetic. If you can see a line that continues around a curve, feel a section that’s out of round, or find any gap you can see daylight through — stop and get it inspected.
Is It Safe to Drive on a Scratched Wheel?
Minor cosmetic scratches: yes, though unrepaired damage does let moisture reach bare metal. Alloy wheels don’t rust like steel, but exposed aluminium does corrode — and corrosion under the paint edge spreads outward, making the eventual repair larger.
Stop driving and get the wheel inspected if you notice:
- Any visible crack, however fine
- The tyre losing air, even slowly
- New vibration through the steering or seat
- The car pulling to one side
- Visible deformation or wobble in the wheel
- A chunk missing from the rim edge
Those aren’t cosmetic problems. A cracked wheel can fail without warning at speed. Wheel and tyre damage can sometimes occur together. Learn what to do if you have a punctured tyre and why driving on a damaged tyre can put the wheel at further risk.”
Repair or Replace? Decision Flow
Know Your Wheel Finish Before You Start
This determines whether DIY is even possible, and almost no competing guide explains it properly.
| Finish | DIY suitable? | Notes |
| Painted alloy | Excellent | The most forgiving. Most silver, grey, and black wheels |
| Powder-coated | Good | Repairable, but a full recoat gives the best match |
| Machined / two-tone | Difficult | Machined face is hard to blend by hand |
| Diamond-cut | No | Needs CNC lathe refinishing — DIY will look obviously wrong |
| Chrome | No | Plating can’t be replicated at home |
| Polished aluminium | Moderate | Possible, but blending polish is genuinely skilled work |
How to tell if you have diamond-cut wheels: look closely at the face under light. If you see fine concentric machining lines, like grooves on a vinyl record, that’s a diamond-cut finish.
Sanding through it destroys the pattern, and you cannot recreate it by hand. These need a specialist with a CNC lathe.
Painted wheels are the ones where DIY genuinely shines.
Tools and Materials You’ll Need
| Item | Purpose |
| Sandpaper, 240–2000 grit | Progressive smoothing |
| Wheel cleaner and degreaser | Surface prep |
| Masking tape and plastic sheeting | Protecting tyre and surrounding wheel |
| Alloy or automotive filler | Filling gouges |
| Self-etching primer | Adhesion to bare metal |
| Colour-matched wheel paint | The colour coat |
| Automotive clear coat | Protection and gloss |
| Microfibre cloths | Cleaning between stages |
| Safety glasses, dust mask, gloves | Non-negotiable when sanding metal |
Total materials cost: roughly $25–70 depending on whether you buy a kit or components separately.
On paint matching: get your wheel colour code from the vehicle’s paint information, or take a photo to an automotive paint supplier. “Silver” covers dozens of shades, and a near-miss is more visible than the original scratch.
Step-by-Step: Repairing Scratched Car Wheels
Clean → Mask → Sand → Fill → Sand → Prime → Paint → Clear → Cure
Step 1: Inspect thoroughly
Wheel off the car if possible, cleaned and dry. Check the inner barrel and the back of the spokes too — curb damage sometimes extends further than it first appears. Confirm you’re dealing with cosmetic damage only.
Step 2: Clean the area properly
Wash with wheel cleaner, rinse, dry completely, then wipe with degreaser or isopropyl alcohol. Any brake dust, wax, or tyre dressing left behind will stop paint adhering. This step causes more failed repairs than any other.
Step 3: Mask the tyre and surrounding areas
Tuck masking tape between the tyre bead and the rim edge, then cover the rest of the tyre with plastic sheeting. Mask a generous area of the wheel around the repair.
Step 4: Sand the damage
Start around 240 grit to knock down raised, rough metal — curb rash leaves burrs that stand proud of the surface. Work only on the damaged area, using moderate pressure and straight strokes.
The key discipline: remove the minimum metal necessary. You’re smoothing the damage, not carving it out. Over-sanding thins the rim edge and creates a dip you’ll never hide.
Progress to 400, then 600 grit, feathering the edges outward so there’s no hard line between repaired and original surface.
Step 5: Apply filler if needed
For gouges deep enough to feel a distinct hollow, apply alloy or automotive filler slightly proud of the surface. Follow the cure time on the tin — rushing this guarantees shrinkage later.
Shallow scratches don’t need filler at all.
Step 6: Sand the filler smooth
Once fully cured, sand back with 400 grit, then 800, then up to 1500–2000 for a surface ready to paint. Run your fingertips over it with eyes closed — your hands detect imperfections your eyes miss.
Step 7: Prime
Two or three light coats of self-etching primer, allowing flash time between each. Self-etching matters here: it bonds to bare aluminium in a way standard primer doesn’t.
Light coats beat heavy ones every time.
Step 8: Paint
Two or three thin coats of colour-matched wheel paint, again with flash time between coats. Keep the can moving and hold it consistently — around 8–10 inches from the surface.
Conditions matter more than technique. Paint in moderate temperature and low humidity, out of direct sun. High humidity is the single most common cause of cloudy, patchy finishes.
Step 9: Clear coat
Two or three coats of automotive clear. This provides the gloss and, more importantly, protects the paint from brake dust, road salt, and UV. Skipping it means your repair fades within months.
Step 10: Cure properly
Let it cure fully before refitting or washing — typically at least 24 hours, longer in cool or humid conditions. The paint may feel dry long before it’s hardened.
What Results Should You Realistically Expect?
Here’s what most guides won’t tell you: a careful DIY repair on a painted wheel typically looks very good from three feet away and holds up for one to three years before showing wear at the edges.
It’s not a factory finish. Under direct sunlight, at close range, you’ll likely see a slight difference in texture or sheen. That’s normal, and for most owners it’s an entirely acceptable trade against a $150+ professional bill.
If you need genuinely invisible results — a lease return, a car you’re selling at the top of its market, or a high-value vehicle — professional refinishing is the honest recommendation.
A Warning About Bent Rims
Some DIY guides suggest tapping a bent rim straight with a rubber mallet. Don’t.
Alloy wheels are cast or forged aluminium, not steel. Aluminium work-hardens when deformed, and hammering a bent alloy rim can create micro-fractures you cannot see. The wheel may look straight and hold air, then fail under load later.
Even sources that mention this technique acknowledge aluminium is highly likely to crack. That risk isn’t worth taking on a component holding your car to the road at 70 mph.
Bent wheels go to a professional with hydraulic straightening equipment, who can assess whether the wheel is safely repairable at all. Some aren’t.
DIY vs Professional Repair
| Factor | DIY | Professional |
| Cost | $25–70 in materials | $75–300 |
| Time | 2–5 hours plus curing | 1–3 days turnaround |
| Finish quality | Good | Excellent, often factory-match |
| Diamond-cut capable | No | Yes, with CNC equipment |
| Structural repairs | No | Yes, where safe |
| Warranty | None | Often included |
| Longevity | 1–3 years typical | Longer |
Repair Costs (US, 2026)
| Option | Indicative cost |
| DIY kit or materials | $25–70 |
| Professional paint touch-up | $75–150 |
| Curb rash repair (per wheel) | $100–175 |
| Full wheel refinishing | $150–250 |
| Diamond-cut CNC refinishing | $175–300 |
| Bent rim straightening | $100–200 |
| New OEM replacement wheel | $300–900+ |
These vary considerably by region, vehicle, and wheel size — larger and premium wheels sit at the top of every range. Get two quotes before committing.
Worth knowing: if you’re having multiple wheels done, most shops discount per-wheel pricing for a set.
When Replacement Beats Repair
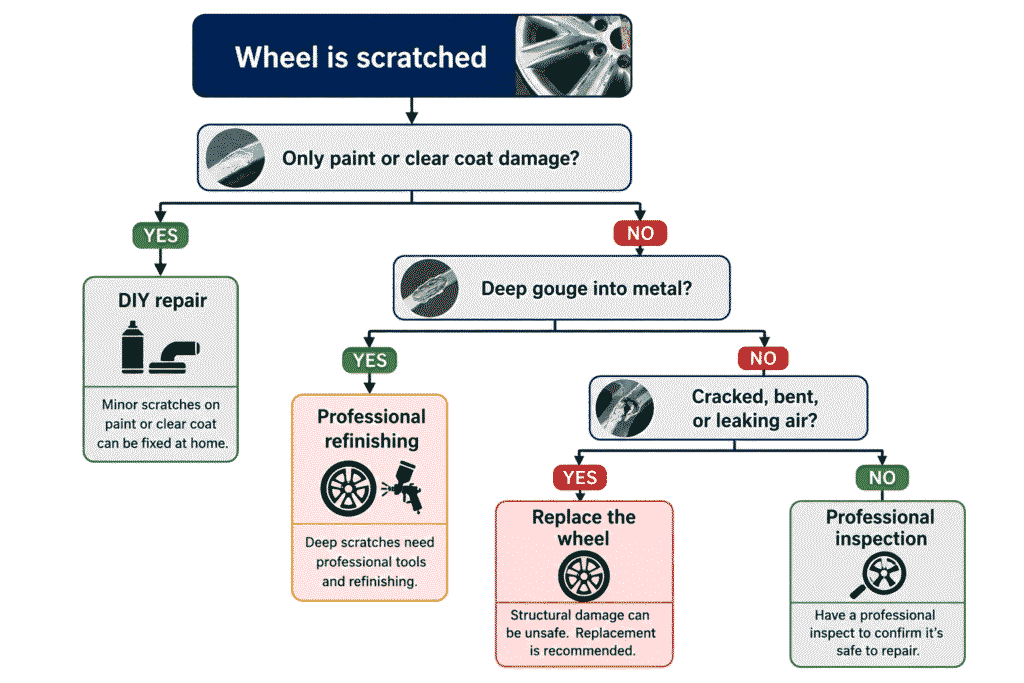
- The wheel is cracked — most reputable shops won’t weld-repair a cracked alloy wheel for road use, and for good reason
- It’s badly bent, particularly at the bead seat
- It’s losing air at the rim
- It’s already been repaired multiple times in the same area
- The structural integrity is questionable after inspection
- Repair cost approaches replacement cost — common on smaller, cheaper wheels
For additional tyre and wheel safety guidance, consult the U.S. Tire Manufacturers Association.
Common DIY Mistakes
- Sanding too aggressively. You can’t add metal back.
- Skipping the degrease step. Contamination ruins adhesion.
- Wrong paint shade. A visible mismatch looks worse than the original damage.
- Skipping self-etching primer. Paint won’t bond properly to bare aluminium.
- Painting in humid weather. Causes cloudiness and poor curing.
- Using household spray paint. It won’t survive brake heat, road salt, or UV.
- Refitting before full cure. Fresh paint marks easily.
- Attempting diamond-cut wheels by hand. The machining pattern can’t be recreated.
- Ignoring structural damage because the wheel “looks fine.”
Does Insurance Cover Scratched Wheels?
Generally, cosmetic wheel damage isn’t worth an insurance claim, but here’s how it breaks down:
Collision coverage may apply if the damage happened in an accident, though your deductible often exceeds the repair cost.
Comprehensive coverage typically covers damage from road debris or vandalism, not curb strikes.
Wheel and tyre protection plans — sold at dealerships — do specifically cover this, and can be worth it if you have expensive wheels or park in tight urban spaces.
Lease agreements are where this bites hardest. Wheel damage beyond “normal wear” frequently triggers end-of-lease charges, often more than a repair would have cost. If you’re leasing, repairing before return is usually the cheaper path.
Does Wheel Damage Affect Resale Value?
Yes, more than the repair cost justifies leaving it.
Scratched wheels are among the first things buyers and appraisers notice, and they signal careless ownership regardless of how well the car has been maintained otherwise. Dealers routinely deduct from trade-in offers for visible curb rash, and certified pre-owned inspections often flag it.
Spending $50 and an afternoon before you sell is usually the highest-return detailing work you can do.
How to Prevent Future Wheel Scratches
- Park further from curbs — even six inches of margin helps
- Use your parking camera and sensors, not guesswork
- Approach parallel parking at a shallower angle
- Fit rim protector strips if you park in tight urban spaces
- Check tyre pressure regularly and understand how your car’s tyre pressure monitoring system works so you can spot pressure warnings before they lead to further tyre or wheel problems.
- Slow down in parking garages and over speed bumps
- Wash wheels regularly to spot damage early
- Avoid potholes where you safely can
Key Takeaways
- Cosmetic scratches and light curb rash are genuinely DIY-friendly
- Cracks, bends, and air leaks are never a DIY job
- Diamond-cut wheels require CNC refinishing — don’t attempt at home
- Preparation determines the result more than paint does
- A good DIY repair typically holds up 1–3 years before showing wear
- DIY materials run $25–70 vs $100–300 professional
The Bottom Line
Most scratched car wheels are a Saturday afternoon and $40 of materials away from looking respectable again. The process isn’t complicated — clean thoroughly, sand patiently, prime, paint in thin coats, clear coat, and let it cure properly.
What separates a good repair from a bad one is almost entirely preparation and restraint. Remove the minimum metal, take the time to degrease, and don’t rush the curing.
And be honest about the one thing DIY can’t address: if the wheel is cracked, bent, or leaking air, that’s a safety component, not a cosmetic one. No amount of filler and paint changes what happens to it at highway speed.
Sources:
- NHTSA
- US Department of Transportation
- Tire Industry Association
- SAE International
- Manufacturer owner’s manuals
Frequently Asked Questions
Can scratched alloy wheels be repaired?
You can repair cosmetically scratched alloy wheels yourself using some alloy filler, sandpaper, alloy primer, and colour-matched wheel paint along with a clear top coat. If the damage consists of cracks or serious gouges however, the wheel needs to be checked out by the pros as some alloys can’t hold air pressure in the first place if they aren’t up to scratch.
How much does wheel repair cost?
DIY materials run $25–70. Professional repair typically ranges $75–300 depending on damage severity and wheel finish.
Can curb rash be repaired permanently?
It can be repaired durably, though a DIY repair typically shows wear after one to three years. Professional refinishing lasts longer.
Is it safe to drive with scratched rims?
Cosmetic scratches, generally yes. Cracked, bent, or air-leaking wheels should be inspected before further driving.
Do scratched wheels rust?
Steel wheels rust where coating is broken. Alloy wheels don’t rust in the same way but do corrode, and corrosion spreads under the surrounding paint.
Can I just use touch-up paint?
For very light scratches, yes. Deeper damage needs sanding, primer, and clear coat for a repair that lasts.
Are diamond-cut wheels repairable?
Yes, but only professionally, using CNC lathe refinishing. Hand repair cannot recreate the machined pattern.
Can scratched wheels fail a vehicle inspection?Cosmetic damage typically won’t. Cracks and structural damage can.
How long does a DIY repair take?
Two to five hours of active work, plus at least 24 hours curing before the wheel returns to service.
Should I repair the wheels before selling my car?
Usually yes. It’s inexpensive relative to the deduction buyers and dealers apply for visible damage.
Can I repair the wheel without removing it?
You can, and many people do. Removing it gives better access, safer working position, and a noticeably better result.
Disclaimer
This article is for informational purposes only and provides general guidance on how to repair scratched car wheels, including DIY methods, tools, materials, and estimated costs. Repair suitability depends on the type and severity of the damage, as well as the wheel’s material and finish. Cracked, bent, or structurally damaged wheels should be inspected by a qualified professional and may require replacement. Always follow product instructions and safety precautions before attempting any repair.